
admin
-
Posts
334 -
Joined
-
Days Won
17
Content Type
Forums
Gallery
Blogs
Events
SuperQuote
Opentype’s IPS FAQ
SuperHelp
SuperGrid
SuperReviews (Mode1)
SuperReviews (Mode 2)
Restaurants (Mode 3)
Reviews (Mode 3)
Beatles (Discography)
SuperVote
Academy Classroom
Pages SuperGallery
Free Articles
SuperAccordion Pro Demo
Store
Downloads
Everything posted by admin
-
 By default, Pages databases work best for articles. This template sets puts the Record Image field front and center. As a result, Pages categories can now be turned into beautiful & minimalistic galleries, where each record represents one image (with a title and description). All Pages functionalities like comments, ratings, reviews and custom fields are also available. The original idea was to create a template set for online art exhibitions, but the template set has a wide range of possible uses. Any kind of content centered around images can be improved by this plugin: How-to guides using images. A travel blog. A designer’s portfolio … This product is not meant to replace the Gallery app. It’s a way to create galleries as part of the editorial content on your website. The record display view has 3 possible layouts which can be applied automatically: portrait image, landscape image and “no image”. The latter creates a center column with content from the editor field, which can be used for an introduction, chapter dividers and so on. A bonus feature is limiting the number entries guests can view (starting from the first record in a category). This can be used to encourage guests to register. What’s required: The Pages application with access to Pages Databases What’s included: A category index template (with support for Pages Category Image) A listing template A record display template A plugin with settings (see below) Detailed feature description: Global settings: Item background: dark or IPS default box Limit number of entries guests can see. Yes/No Number of entries a guest can see Listing settings: Thumbnail fill type: contain or enlarge to fill Use black&white effect Display settings: Image column aspect ratio: portrait only, landscape only, dynamic (based on the image) Allow Lightbox Yes/No Show creator on record view Show creation time on record view Use image effects (shadow/rounded corners) Notes: The templates can be used for multiple Pages databases, but the plugin settings will apply to all databases at once. The ordering comes from the Pages database ordering settings, as with any Pages database. There is no drag-and-drop ordering of the images. For ordering, a stock field like record ID or title can be used or a custom ordering field can be created. However, the ordering field needs to contain unique values. Fields like “rating” or “views” cannot be used.
 -
The download ‘Pages SuperAccordion Pro’ is available here to current subscribers of the OPENTYPE.SPACE Academy.
-
When you set up Apple Pay through Stripe as a new Commerce payment method, you will notice that Apple requires an identification file to be hosted on your website. But what if you don’t have access to the file system, e.g. because you are using IPS’ cloud offer? Well, you can also host the file through the Pages app. Here is how: First, set up the payment method in the Commerce settings using your Stripe credentials. Under the Apple Pay field, there will be a link to “register your domain” with Stripe. Open it in a new tab and save your Stripe settings. Still in the ACP, open the pages section and create a new folder called “.well-known”. (Yes, the dot is necessary.) Create another folder called “apple-developer-merchantid-domain-association”. Make sure to select the “.well-known” folder as parent! Now create a “Manual HTML” page inside the sub-folder. Call it “index” and give the filename “index” as well. Make sure to turn off “Use suite HTML wrapper”. The Page Wrapper should also be set to “none”. Save the page. On the right, open the page options and choose “Make default page for this folder”. Switch to the Stripe tab and click “Add New Domain”. Enter your domain. Make sure there won’t be any forwarding. If your website uses “www”, you need to add that as well. Now download the verification file and open it in an editor. Copy the text from inside the file. Go back to the ACP and add the content of the file to the page that was just created and save it. Test the URL in your browser. So, https://www.yourdomain.com/.well-known/apple-developer-merchantid-domain-association should directly return the apple verification string and nothing else. Once that is working, click “Add” on the Stripe page. Stripe will try to access the verification page and if it was found, Apple Pay will be working now. If there was an error, follow the instructions given by Stripe.
-
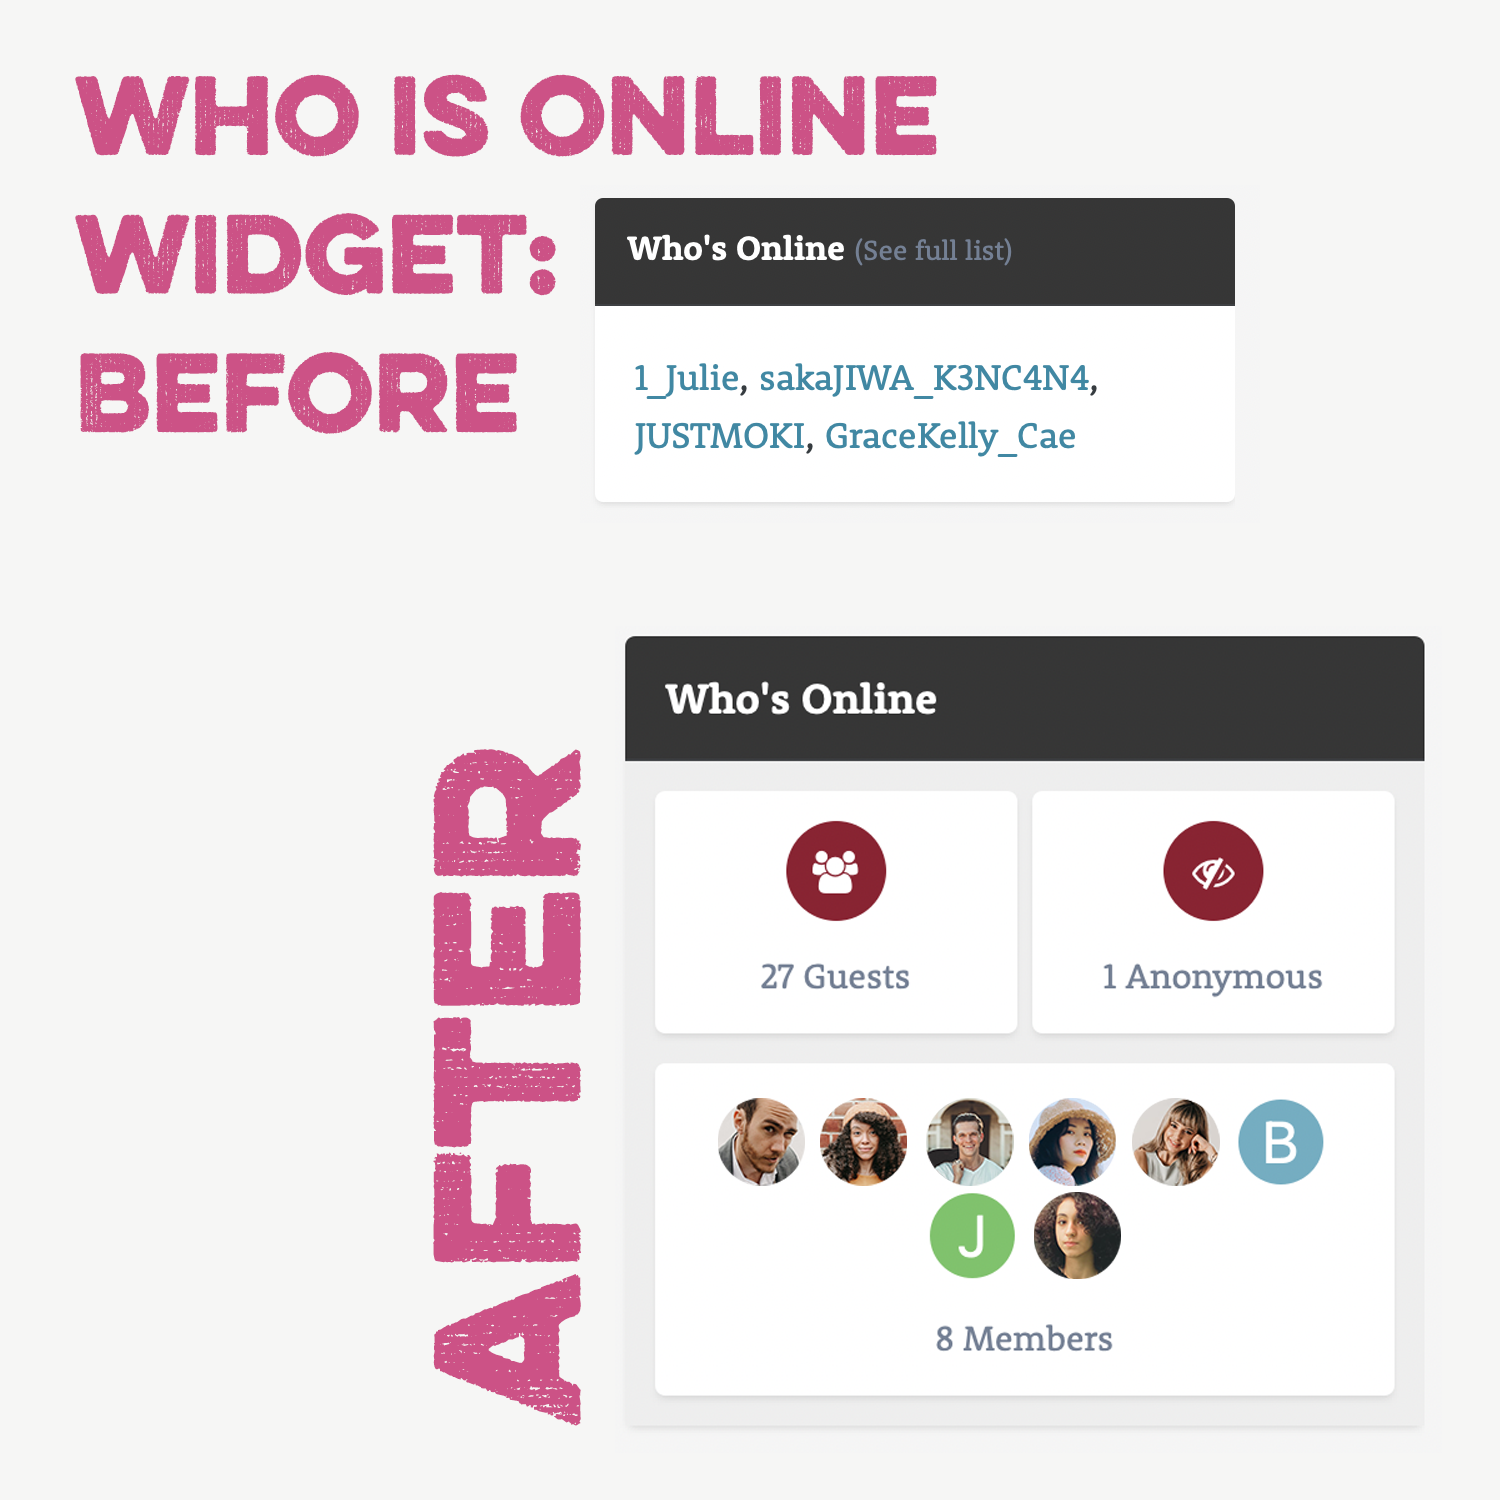 This plugin adds two widgets to your website, which improve the core widgets “Who is online” and “Recently Browsing” through a new design. The members are not only shown with their username, but also with their avatar. Available global settings: Widget background: normal or light Maximum number of avatar images to show Notes: Works with any installation of the Invision Community as it is based on core widgets. Access permissions are respected. If member profiles cannot be accessed by guests for example, the profile links will also be suppressed for the avatars. Caching works just as with the original core widgets. With longer caching times for blocks, the Recently Browsing widget might not work well, as it will not show the data in real time.
 -
Running online communities will often feel like parenting. You have to settle disputes, ask your members to behave and even punish them when necessary. There is just no way around it. If many people get together in one place, there will be conflicts. And as community owner, you have no choice to step in, even though it will often feel like you will be the ‘bad guy’ no matter what. If you don’t step it, your members will complain about that and things will probably escalate. And if you do step in, at least some of your members will complain about the moderator actions, because they are directed at them. But you can at least try to minimize the problems around conflict in online communities. And you do that with good terms of service and actions based on them. In this article, I am explaining my strategies for dealing with conflict in online communities, which I developed and tested for over 20 years.
-
In this bonus lesson I explain how I built this very section on opentype.space, where database records can be accessed by anyone, but only paying members will see the actual course content and everyone else is encouraged to upgrade their account to get access. Background: With Pages databases you can easily set custom permissions on the category level to offer content exclusively to certain member groups, like your paying members. But there is a problem: if you remove the access for guests and regular members, the exclusive articles will be completely hidden from anyone who isn’t already in the member group that has access. So the users who don’t have access do not know what they are missing and the articles cannot act as advertising for the exclusive content and the paid memberships. Even if you would manually link to those exclusive articles, users without access would only see a generic error message that wouldn’t encourage them to upgrade their account. In this Academy lesson, I am explaining how I solved this problem for this website and I provide the necessary code, so you can add this functionality to your community as well.
-
Community admins always want to improve their website and there are typical areas of concern like ‘search engine optimization’ and ‘page speed’. But often, when I see websites running the Invision Community Suite, I see an area that is needlessly neglected, even though it would be easy to improve and changes could make a huge difference: the menu! Think about it: It’s one of the most important parts of your website, because it is what users interact with the most when they browse your website. The links you put in your primary navigation bar tell guests what your site is all about and a carefully crafted menu can make the difference between leaving your site instantly or continuing to explore it. And your menu also influences the behavior of your most active members. When important areas of your website need too many clicks to reach, they will of course see less activity. And if you have commercial offers on your website, the menu can also directly influence your income! That’s why I constantly try to improve the menus of my community websites. And here is my selection of proven menu improvement strategies for you. Enjoy!
-
There is no better way to learn about Pages databases than to follow the setup of a database in a real-world scenario. This is what we do in this lesson.
-
Unleash the power of Pages with custom Pages databases tailored to your niche. This lesson describes all features and settings of Pages databases.
-
The layout options for Pages blocks and databases are currently pretty limited. But with the Pages template system, 3rd-party templates can easily be installed and customized. This is what will be discussed in this last lesson.
-
Pages blocks created in the ACP come with several significant advantages. In this lesson, these advantages and explained and the process of creating custom Pages blocks is shown.
-
In the this lesson, we are laying the foundation for all other lessons by explaining the management of custom pages on the front and back end.
-
In this lesson, we discuss what Pages is, how it compares to other content management systems like WordPress and we look at a few examples of Pages in use.
-
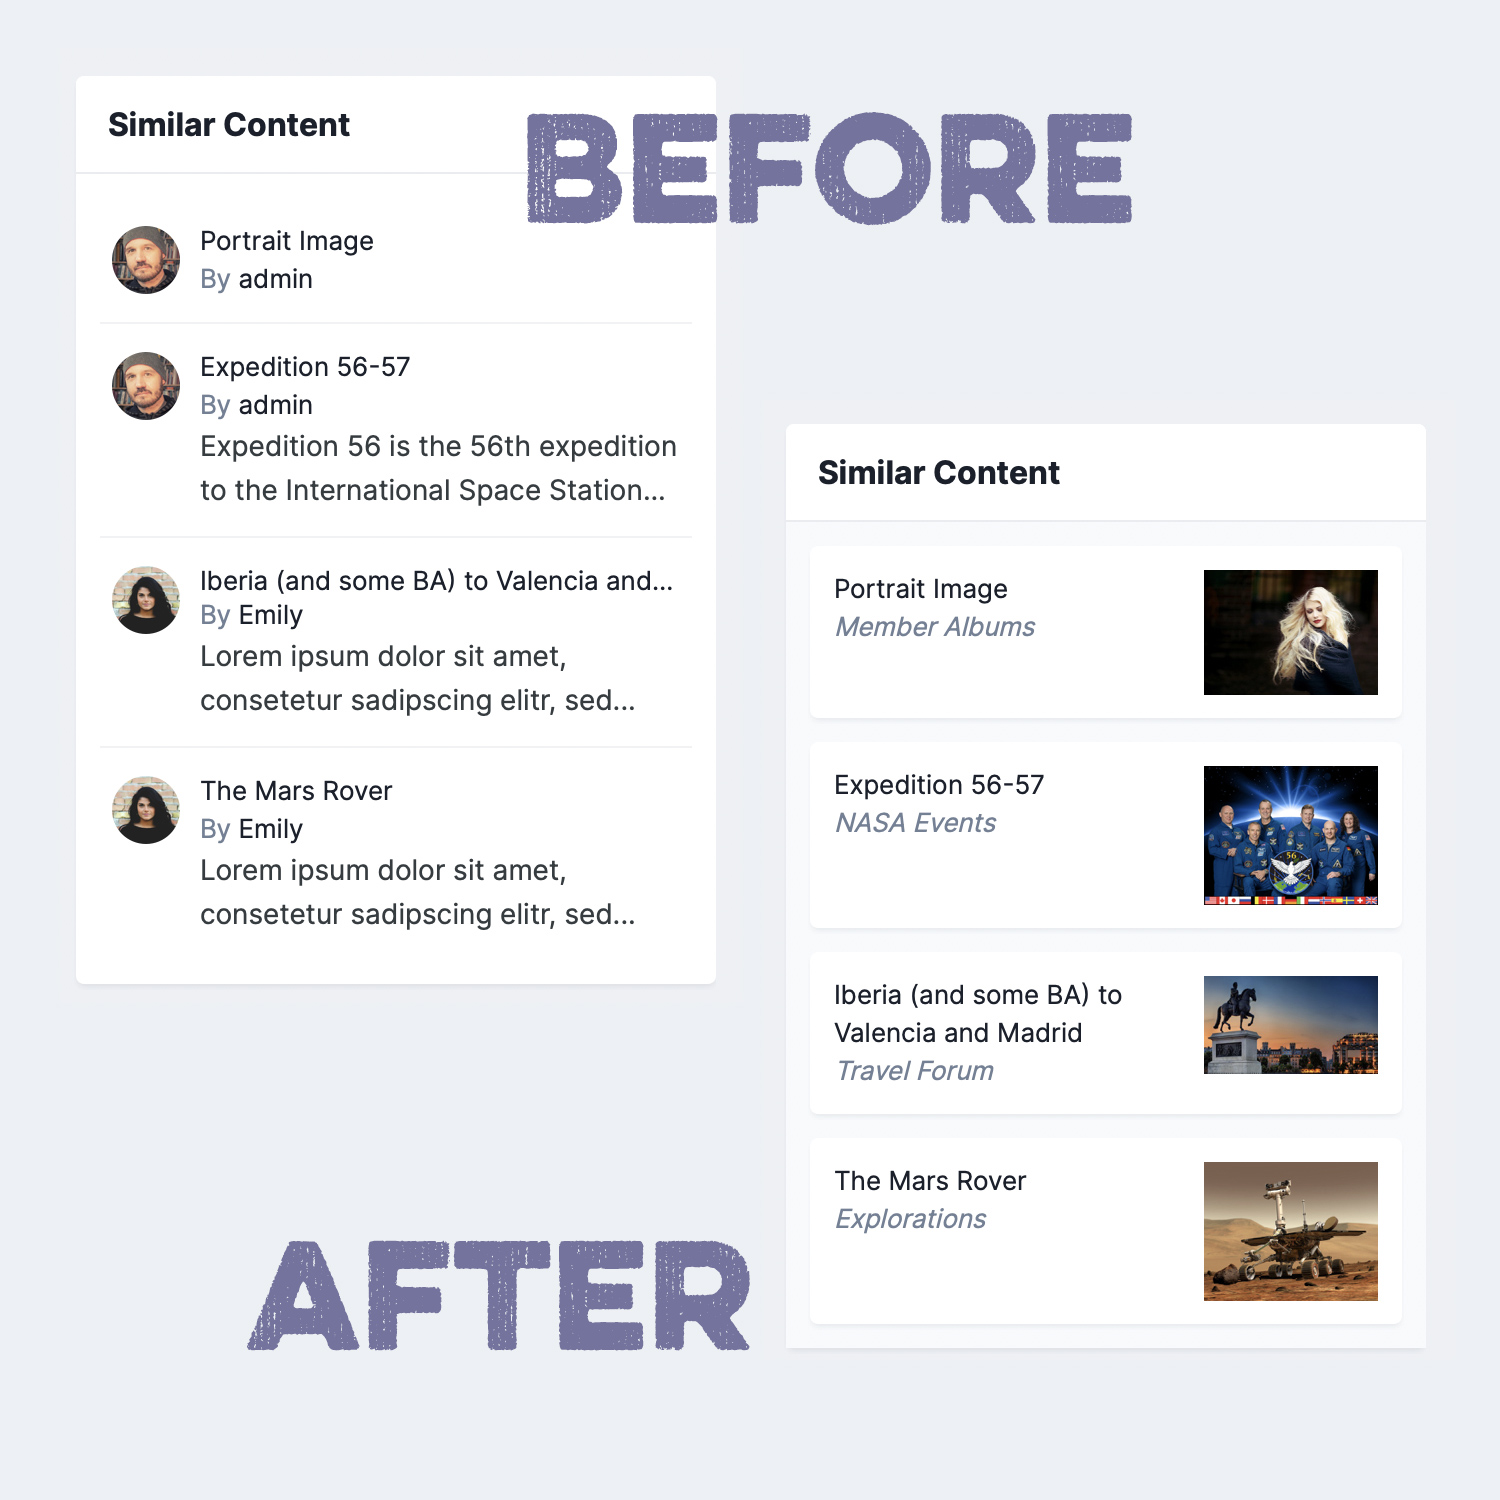 Tags and IPS’ Similar Content widget are a powerful way to provide helpful additional content on a page and to increase the page view count, since there are always more related entries suggested. Unfortunately, the stock version of the Similar Content widget is rather dull. This plugin takes the Similar Content widget to a new level. It retrieves images from the entries (where available) and it also shows the entry’s container name so your users understand where they will be taken before clicking on the entry. Additional settings (listed below) give admins more control over the content of the widget. Directly Supported Content Types: Pages records Forum topics Download files Gallery images Calendar events Settings: Show/Hide entry author Show/Hide text preview Show/Hide forum images Show/Hide calendar images Widget background: “Area Background” or “Area Background Light” Notes: The plugin only changes the look of the entries. It doesn’t influence which entries are shown or how they are ordered.
 -
This is a reply with an image. This is a reply with an image. This is a reply with an image. This is a reply with an image. This is a reply with an image. This is a reply with an image. This is a reply with an image.

-
 SuperVote is a Pages listing template to add a thumbs-up/thumbs-down functionality to create engaging voting databases like ranker.com. While Pages databases already have a rating functionality, each record needs to be opened first and a rating value between 1 and 5 has to be chosen. With SuperVote, voting gets much easier and you will get a lot more votes. What’s needed: Invision Community 4.5 with the Pages application You should be familiar with setting up Pages databases How it works: Under the hood, SuperVote uses the regular voting system of Pages. A thumbs-up click will save a 5-star rating; a thumbs-down click represents 1 star. Because SuperVote uses the standard voting system, you can easily add the template to existing databases and also remove it at any time without loosing any data. Users are also still able to leave 2-, 3- or 4-star ratings on the record view page (A dedicated record view template might come later if requested). Each entry in the listing view is represented by the record title and the record image (if available). You can also add additional custom fields to the listing view. The listing entries link to a full record view page as usual. The amount of information shown on mobile phones can be controlled through the plugin settings. Settings/Features: Record image aspect ratio narrow normal wide Show record image on phone view Show meta information on phone view Show guest rating buttons on phone view Downvote BG color Upvote BG color Voted icon color Limit downvoting for new accounts Notes: Voting is limited to registered members as with any Pages database. The template can be added to an unlimited number of databases or database categories, but the plugin settings will apply to all uses at the same time. The listing page doesn’t offer moderation options (like mass-move, mass-delete). These type of functions have to be performed from the ACP.
 -
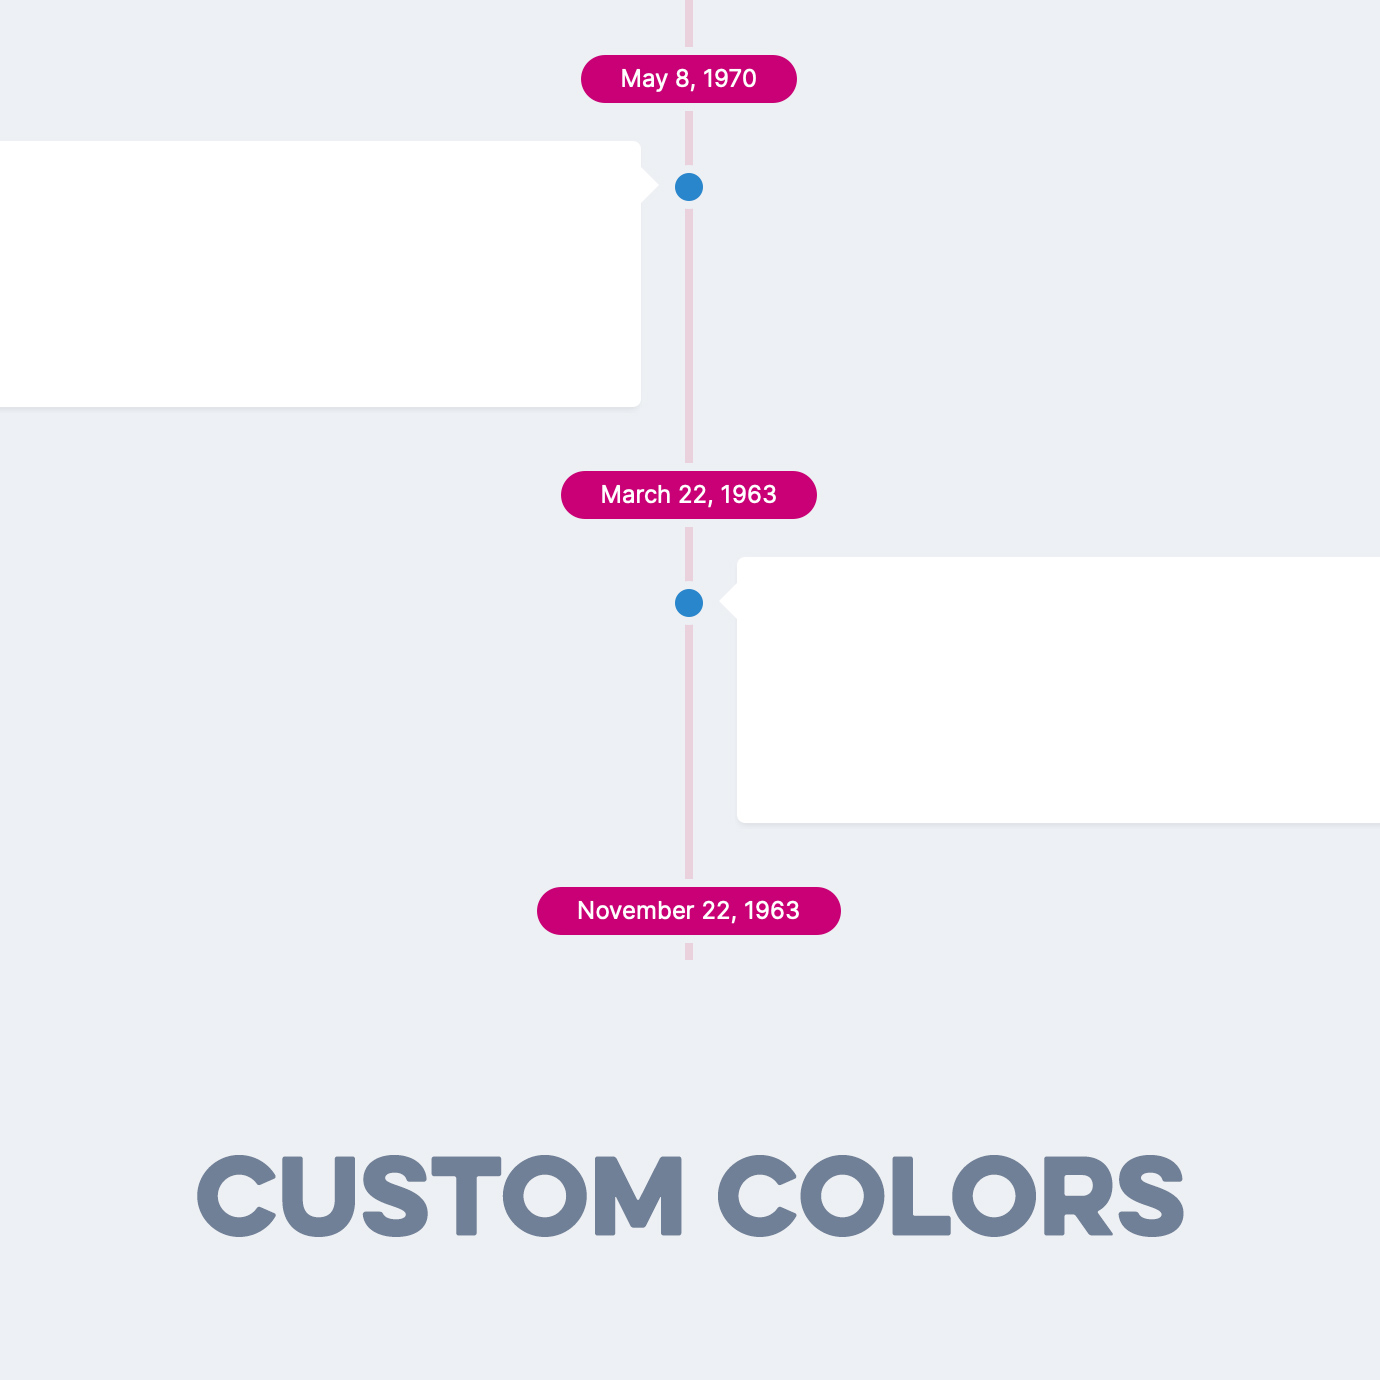 SuperTimeline is a carefully crafted listing template for Pages databases. As the name suggests, it allows you to show Pages records as a timeline. The template is fully responsive, supports left-to-right or right-to-left websites and comes with lots of options for granular control of what is shown in the listing template. The template has 3 modes: Mode 1 will show the database order field next to the entry. Perfect for entries representing events that happened on a specific day. Mode 2 shows the database order field above the entry and it will group multiple entries with the same value. (For example: you can group entries which belong to a certain year or month.) Mode 3 hides the order field. What’s required: Invision Community 4.x with the Pages application and access to Pages Databases. List of Features: Set Mode Feature Single Entries Group Entries No highlighting Render time/dates If your order field is a timestamp, you need to turn this on to show it as a date. Alternatively, you can also use other custom fields as order fields, e.g. a number field for years, months or combinations of the two . Record image size small, medium or large RTL mode What to show in each card Show record creator Show creation time Show comment count Show view count Show rating/review stars Show truncated content field Show meta fields inline or on one line each Override theme colors? Grouping badge background (mode 2) Grouping badge text color (mode 2) Timeline color Entry dot color Feature text (mode 1)
 -
Upgrading Pages templates was tricky until Invision Community 4.4. If a template set already existed, a new set was added in addition to the existing one. To avoid that, templates would have to be manually deleted before the upgrade and database templates had to be manually reassigned to the database after the installation of the new files. All of this changes with Invision community 4.5. Pages templates are now part of apps/plugins. There is no need anymore to install the templates separately. (In fact, it’s barely possible anymore since the 4.5 Marketplace only allows single file uploads). Linking the old products to the new ACP Marketplace After upgrading to 4.5, you have to link all your existing 3rd-party products to the new ACP Marketplace. This process is described here: https://invisioncommunity.com/4guides/welcome/install-and-upgrade-r259/#note45 You can only proceed after that. Otherwise no update options for the existing products are provided. How to upgrade my Pages template sets ( like SuperGrid, SuperBlocks …) After you finished the 4.5 onboarding process, updates will be recommended to you after a while. All my Pages products will appear under Plugins. You can start an upgrade with a single click from the ACP. If there aren’t any customizations to the templates, the upgrade will be fully automatic and there is nothing you need to do. Both the plugin and the templates will be upgraded. Dealing with template changes or customizations If the templates appear to be customized, a new conflict dialog will appear as part of the plugin upgrade process. It will show you the old code (left) and the new code (right) next to each other and highlight the changes. In general, it is recommended to click the “Use this version” button on the right for each template to use the new code. Once you made a decision, the code block will collapse and you can proceed to look at the next template. If you made a decision for every template, it will look like this: You can now click Finish and Save. That’s it. Your plugin and all templates are up do date.
-
 Users can simply copy any song link from Apple Music and paste it in the editor. The plugin will turn the link into a native player. Album example: Song example:
 -
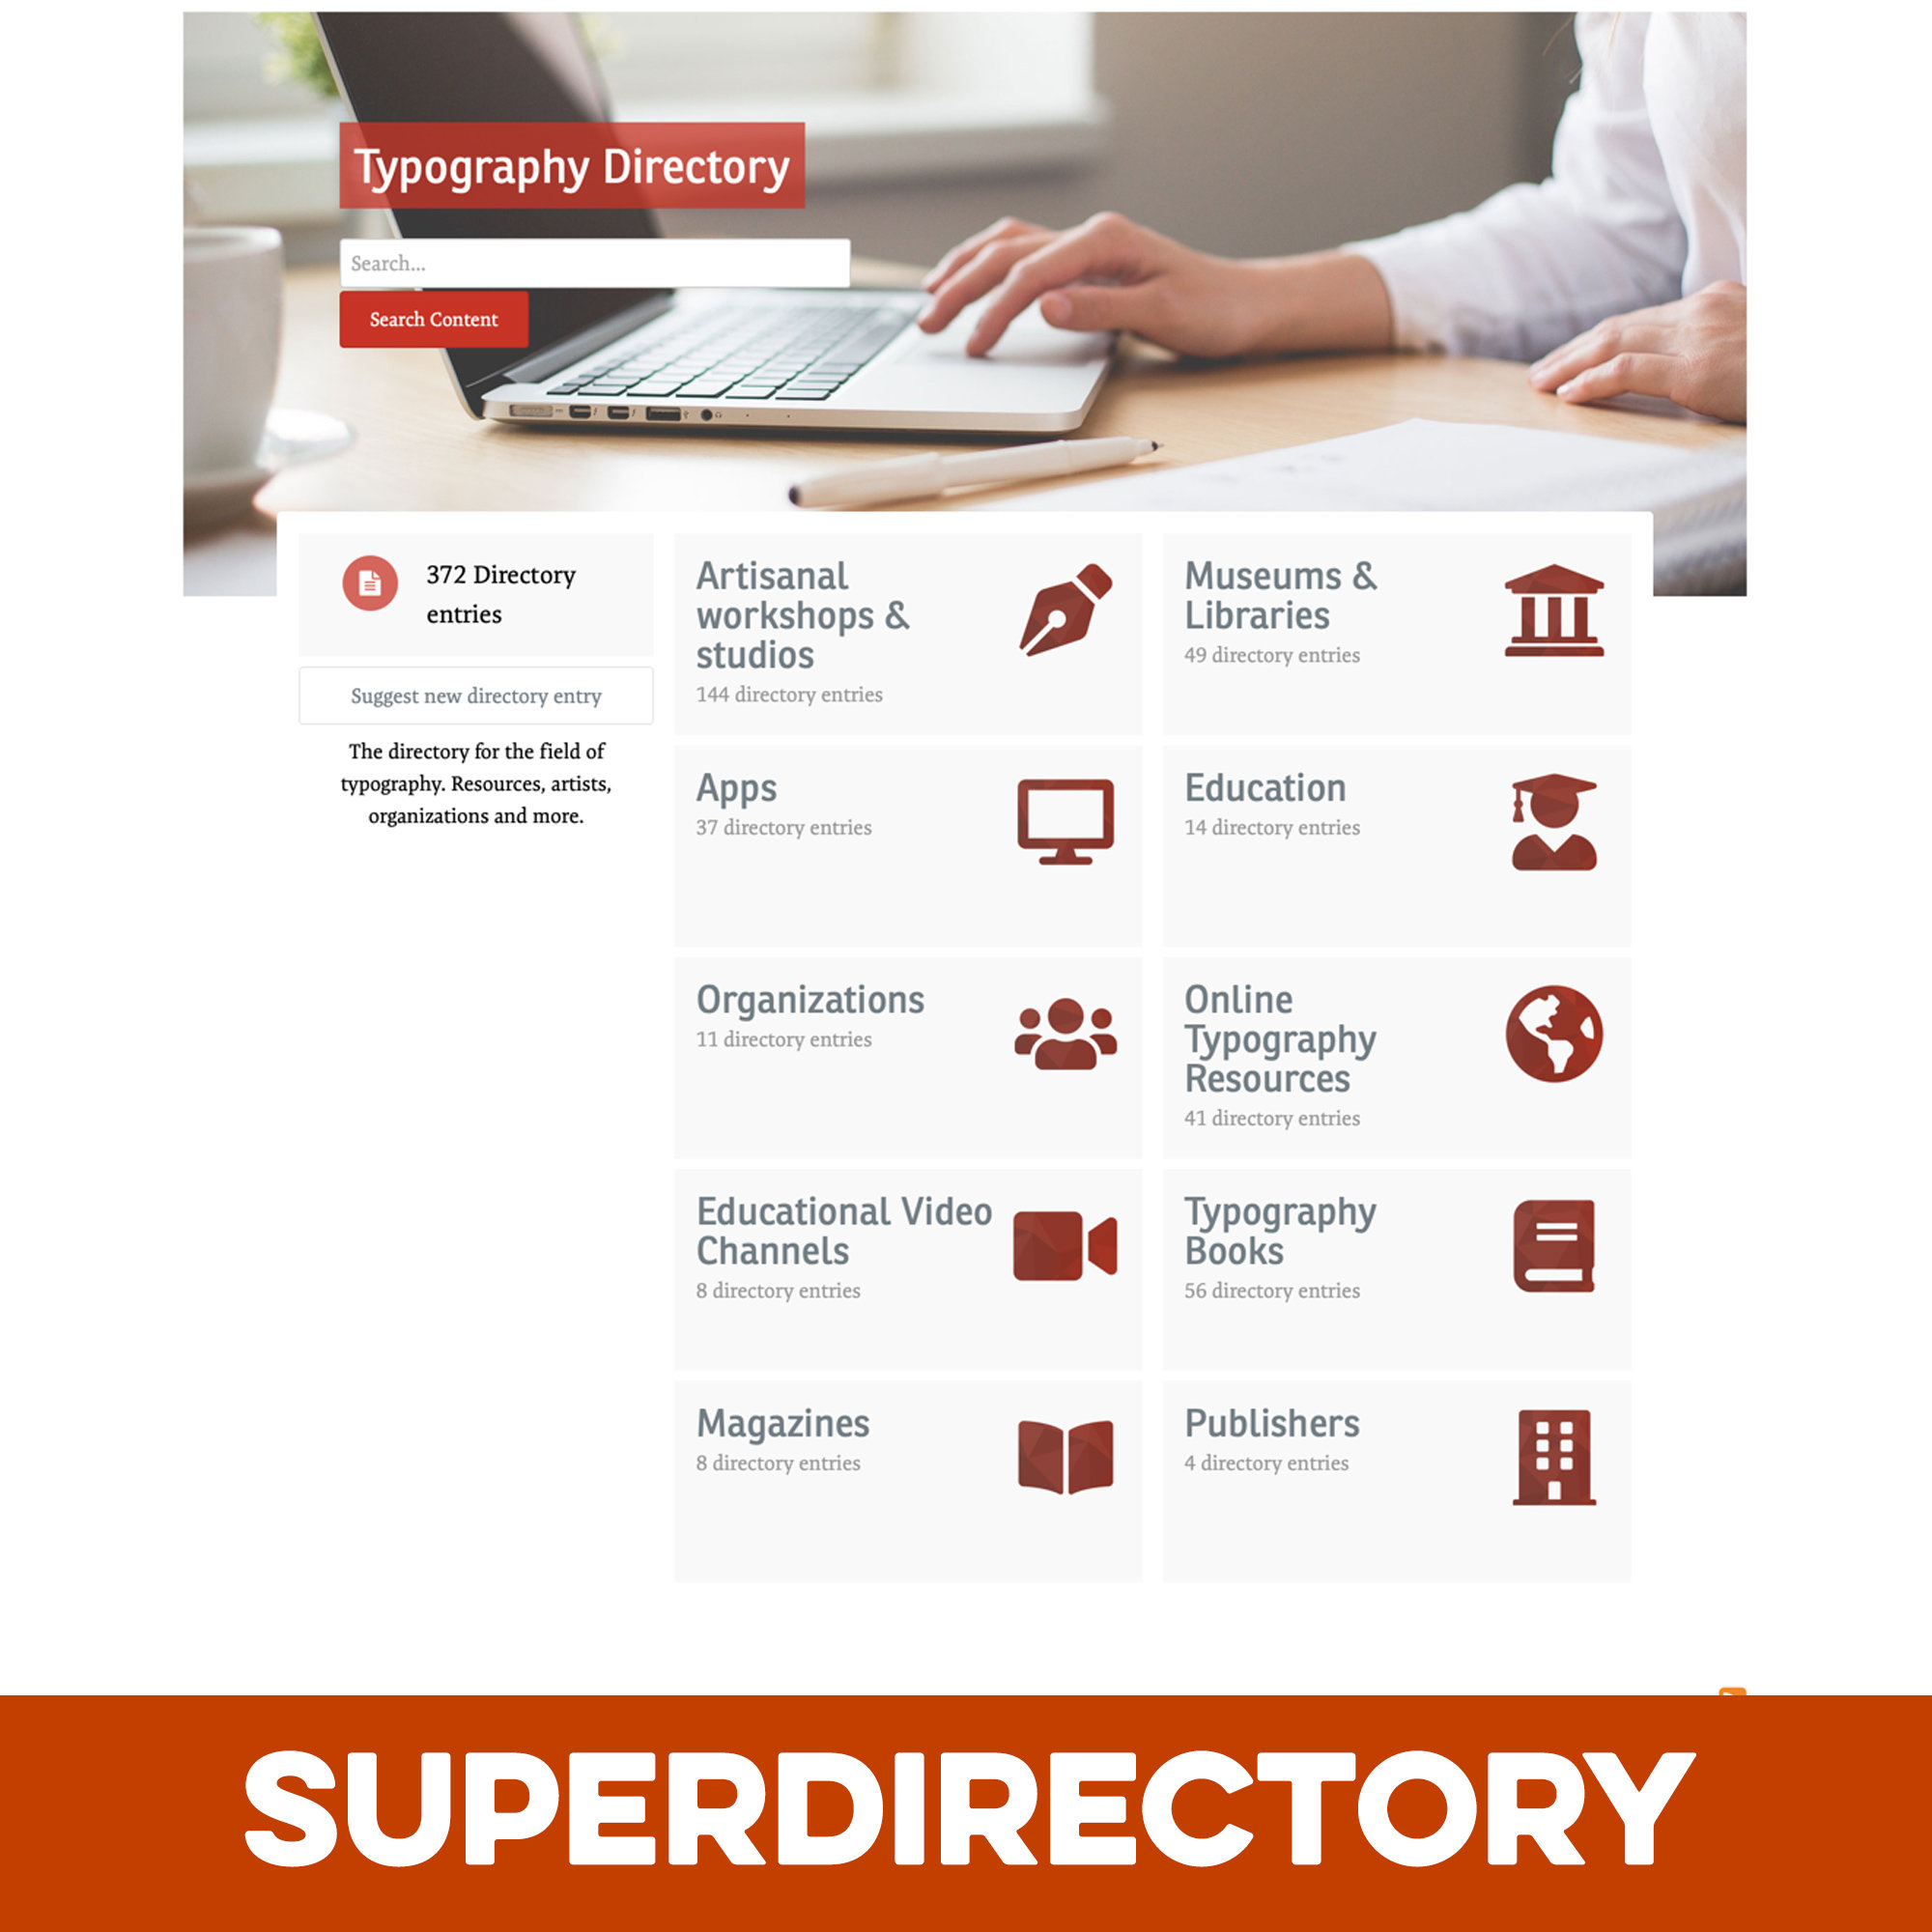 Pages SuperDirectory is a set of Pages templates to create directory sections on your site using Pages databases. Use the full power of Pages combined with a beautiful and engaging template set. You can create any type of directory: Job boards, company directories, links from your field, developers on your site … whatever you want! Check out the live demo! What’s needed: Pages application with access to Pages Databases You should be familiar with setting up Pages database. Your Pages database should use multiple categories and the record image. What is included: A Pages template set for the views: record listing, category listing and record view A settings plugin to customize the directory databases detailed installation instructions as PDF Detailed Feature Description: All featured ordered by template view: General: User Mode. Choose to either feature the record image (default) or the creator avatar (for a directory of members on your site.) Header background color Header foreground color Header background opacity Support for category images using the Category Images app by All Astronauts Category View: Show search form (Yes/No) “Add Record” button on homepage (Yes/No) Use custom header image (linked file as URL) Set custom image as OG:image to make your directory homepage look good on Social Media (Yes/No) FontAwesome record icon (shows next to the record count) Number of category columns (1/2/3) Show sidebar on index (Yes/No) Listing View: Number of record columns (1/2/3/4/6) Show record creator (Yes/No) Show record stats (Yes/No) Show reviews/ratings (Yes/No) Show sidebar on listing view (Yes/No) Show moderation checkboxes (Yes/No) Record View: Show record stats (Yes/No) Show reviews/ratings (Yes/No) Show creation time (Yes/No) Show record creator (Yes/No) Show follow button (Yes/No) Show tags (Yes/No) Show creator contact button to create an on-site private message (Yes/No) Show sidebar on record view (Yes/No) Special features: Turn an image upload field in a mini gallery: Activate the User Mode to create a directory of community members with an option to contact them:
 -
Love it.
-
Love it.
-
This is a reply without image. This is a reply without image. This is a reply without image. This is a reply without image. This is a reply without image. This is a reply without image. This is a reply without image. This is a reply without image. This is a reply without image.
-
A new reply.
-

To Istanbul by Train as the only passenger in a sleeping car
admin replied to Frank's topic in Travel Forum
A new reply.